0017The Lichtspiel
2018-03-23
What do you make for a toddler’s second birthday? Doesn’t matter – as long as it has lots of switches, plugs, and lights!
I had been thinking about building such a thing for a long time, but I never managed to get a clear idea what it actually should look like. Fortunately, I finally came up with a concept just in time for Alma’s second birthday:

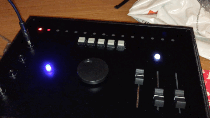
The device would feature a big RGB LED in the centre, its colour controlled by three slide potentiometers below. Above, several push button switches would toggle individual LEDs of a long RGB LED strip. A big rotary encoder1 would be available to scroll the light pattern on the LED strip to the left and to the right. Finally, on the left, a miniature patch panel2 (a cable and several sockets) could be used to activate special effects on the LED strip.
All components would be mounted on a front plate and contained in a custom built enclosure with enough room for an Arduino-like microcontroller, power source, and all the cabling.
I jotted down this first concept in less than five minutes. Surprisingly, it stood the test of time – only some minor adaptions were necessary while building the actual device. Here’s how it turned out in the end:


Let’s go into the details of building this thing.
Testing the Concept: Breadboard Prototype
To see if the concept would work, I built a prototype on a breadboard. It featured the rotary encoder, the slider controls, some push button switches, and both the single RGB LED and the LED strip3, all connected to an Arduino running an early version of the control software. This enabled me to test out all the core features (except for the patch panel):
Building the prototype was fairly simple, really nothing more than connecting the various components to GPIO ports of the Arduino. I also temporarily fixed the sliders to a piece of foam board to keep them aligned, but that was about it.
Playing around with the prototype already felt quite captivating, so at this point I was confident that the concept would work out. Time to build the real circuitry!
Soldering the Strip Boards
As with most of my projects I did not include a complete Arduino board in the final project, but only the Atmega 328 microcontroller itself. This is fairly simple to do and saves quite a lot of space and money. Also, the circuitry was so easy that I didn’t bother doing any schematics upfront. Instead I started soldering components to the strip board right away, using only an annotated pinout diagram as reference.4
I made separate strip boards for the main circuit, the slide potentiometers, the push buttons, and the rotary encoder. All components were then connected to the main board using ribbon cables. This makes (dis-)assembling the device a lot easier, especially in case of future repairs.5


Here’s the final test run I did before starting to mount the components to the front plate (the LED strip is fastened below a prototype LED cover that I’ll explain more about later6):
The completed circuitry contains one component that I hadn’t thought of in the initial concept: An additional illuminated push button acting as power toggle for the device (you can see it in the video, it’s the thingy glowing in bright blue). Speaking of power …
Power Supply: A Good Idea That Wasn’t
I wanted the Lichtspiel to be usable without external power supply. This meant running from batteries, and running from batteries required implementing a power-saving stand-by mode that turns off all LEDs7 after the device has been idle for some time.
What kind of batteries should be used? Like most microcontrollers the Atmega 328 accepts a wide range of supply voltages8. However, the RGB LEDs require exactly 5V, so this was the voltage to be used. Conveniently, 5V is also the voltage provided by USB power banks, and thus the original idea was born: Simply include a power bank in the device!
To allow recharging the drained power bank an extension cable connecting the power bank’s charging port to a Micro USB plug integrated into the enclosure was to be used:
At first everything seemed okay: The Lichtspiel got all the power it needed from the power bank to work flawlessly. But every time the device went into stand-by mode, the power bank shut off shortly after, completely cutting the Lichtspiel from power. To bring back power it was necessary to physically disconnect and reconnect the power bank – which was not only a nuisance, but would also require removing the front plate to open the device every time this happened. This was obviously a no-go.
The problem was that unlike batteries, power banks use fairly complex internal circuitry to detect if a device is actually connected and also drawing some minimum amount of current. If there is no device, or if the device consumes too little energy, power banks completely shut off their outputs.
I thought of workarounds like replacing the stand-by button with a physical on-off switch9, or changing the circuitry to make sure it consumed a considerable amount of energy even in stand-by mode (which of course would have completely defeated the purpose of a stand-by mode)10, but none of these options seemed promising.

However, the final solution was simple: I simply did not include a power bank at all! Instead the USB extension cable originally meant to be used for recharging is now connected directly to the main circuit. To use the device, you need to connect an external power bank (or an USB charger). Turns out toddlers love plugging in cables anyway, so in the meantime this has even become a much liked feature.
With all the circuitry completed and the question of power supply solved, it was now time to build the front plate!
Prototyping the Front Plate
I’m notoriously bad at imagining dimensions of physical objects, so I often resort to building prototypes or quick mock-ups, simply to get a feel for proportions and distances. The Lichtspiel’s front plate absolutely fell into the “mock-up needed” category.
The prototype didn’t need to be actually usable, but it should give a realistic impression of the final device, so I decided to build a 1:1 mock-up using plywood and real components.
To build the mock-up, I simply printed the front plate’s construction drawing on a sheet of paper, making sure it came out in a 1:1 scale. The printout was then glued onto plywood and used as reference for cutting all necessary openings: Circular holes were drilled, and our miniature mill was used to create slits (for the sliders) and square holes (for the push buttons).


I was a bit sceptic at first because I had never before designed a front plate like this, but to my surprise it worked out fine: Placement of the components felt natural, everything was operated easily, and the front plate as a whole was even looking quite good.
Before building the final front plate I now wanted to take care of the rest of the enclosure. This was rather straight forward:
Enclosure: Let’s Build a Box!
The enclosure should be a simple handmade wooden box. I already had a piece of plywood ready with the exact dimensions for the bottom side. The four “side” sides needed to be cut from larger pieces of wood, though. We don’t have a circular saw in the shop, so I used a jigsaw and a lot of sanding to get everything even. The parts were then glued together using wood glue, and sanded again. The completed box was painted black using acrylic spray paint.11
.")


.")
Preparing the Enclosure for Mounting the Front Plate
I wanted the front plate to be positioned inside the wooden box, flush with its top edges. This meant adding some structures inside the box, supporting the plate from below. I decided to use six pieces of square wood, cut to length and glued to the inside walls: One in each corner, and two more half way along the longer sides. The four pieces in the corners would also double up as reinforcements of the box itself.
The front plate should be fastened from the top with small hex socket bolts, so I drilled vertical holes into the four corner supports and used our miniature mill to add horizontal openings about half way down these holes. Nuts were then inserted into these slits together with a drop of glue to hold them in place, acting as counterparts for the bolts inserted from the top.12
Testing the assembly turned out that the front plate, when mounted, was prone to considerable flexing, so another supporting structure was needed near the centre. I simply grabbed the next best piece of wood, brought it to the correct height, and – after checking that it wouldn’t interfere with any of the components mounted to the front plate – glued it to the bottom of the box.


Finally I added thin pieces of foam rubber on top of each support piece to level out any height differences.
Front Plate Finish: Paint or Foil?
Time to tackle the front plate itself! Of course it should be black like the rest of the enclosure, but I still needed to decide about the material and finish to be used. This was rather challenging, because I really wanted the LED strip to look like a row of separate lights. Thus most of the strip needed to be masked, with only a row of circular spots allowing for the LEDs to show through. And for a truly immaculate look, especially with the LEDs turned off, even the LEDs themselves should not be visible directly but instead be covered by some diffuse material.
Initially I thought about using an aluminium plate with a small hole for each LED, but that would have resulted in an uneven surface and direct visibility of the LEDs. Fitting the holes with acrylic would have fixed these issues, but this would have required CNC milling and I was short on time.13
With aluminium out of the question, using matte white acrylic seemed like the next best choice. But acrylic is translucent, so now I had to somehow create a black “mask” covering the complete front plate except for the spots above the LEDs, to achieve the desired finish.
My first idea was to simply spray-paint the acrylic. To mask the spots for the LEDs during the paint job I punched out circular pieces of adhesive foil using a standard office hole punch, its hole diameter being a perfect fit for what I needed.


.")
The result wasn’t as good-looking as I had hoped, though: Sure, the paint itself made for an elegant silky surface, but some of the spots’ edges were rather ragged, looking crappy when the LED below was lit.14
Next idea: Cover the acrylic with black adhesive foil! Using Happylab’s cutting plotter meant I could make very exact cuts for the circular spots and all the mounting holes. And I had to go to Happylab anyway, to laser cut the acrylic.


Eventually this idea worked out great. Together with a friend15 I managed to get the foil positioned exactly, lining up all the cut-outs with the respective mounting holes in the plate. And wrapping the overlapping foil around the sides of the acrylic made for very clean edges.16


Now the front plate was finished. Time to mount the components!
Mounting Components to the Front Plate
For some components mounting to the front plate was trivial: The sockets and the power button were put through their mounting holes, counter-nut fastened, done. The big single LED was simply glued into its hole. The LED strip was attached with black gaffer tape from below.17
But how to mount the push buttons, the rotary encoder, and the slide potentiometers? Or, to be precise: How to mount the strip boards carrying these components?
Screwing wasn’t an option because I didn’t want any more screws on the front plate other than those for fastening the front plate itself. And the components should easily be repair- and replaceable, so glueing didn't seem like the best idea either.
Custom spacers for the rescue! I decided to design and 3d print tiny spacers that would be glued to the front plate. Each spacer would hold a nut18, and the strip boards would be screwed into these spacers from below, the screws never touching the front plate itself.
First I printed some spares to practice inserting the nuts and to experiment with different glues. It turned out that “Ruderer” plastic glue worked best, so I used that for the actual spacers.


To get the spacers positioned correctly I screwed them to the strip boards (as seen in the last image), before glueing the whole assembly to the front plate. To avoid the screws getting stuck I removed them again (together with the strip boards) after a few seconds when the glue had started to cure, careful not to accidentally move the spacers in that process. Later, after the glue had cured completely, I could finally mount the strip boards again.
That process screwing the strip boards to spacers holdings nuts was used for the boards carrying the sliders and the rotary encoder. The board with the push buttons needed some special treatment, though: For the buttons to be positioned correctly, this board had to be placed directly below the front plate, with no gap in between. No gap meant no spacers, so this strip board couldn’t be fastened with screws like the others.
Glueing the board directly to the front plate from below would have been an option, but then again the board wouldn’t have been easily replaceable in case of repair.
Therefore I made some “sliding fasteners”: The idea was to have parts glued to the front plate reaching over the strip board from the side, pressing it against the front plate from below. To make the board removable, these fasteners needed to consist of two separate parts connected with screw and nut, allowing them to be tightened once the strip board had been put in place.


")
I first designed a simple version looking similar to the already existing spacers19 – but when tightened it would cant, its top part no longer being horizontal. So I decided to improve the design: By making both parts sloped, the top part could slide back and forth while being tightened, keeping it (more or less) horizontal.
.")
Of course the first, simpler version would have worked perfectly well, too. But it was fun inventing the more complex final version.
The picture to the right shows the front plate from below, after all strip boards had been mounted. The boards on the left (carrying the slide potentiometers) and in the centre (carrying the rotary encoder) are directly screwed to spacers. The board on top, carrying the push buttons, is held in place by four sliding fasteners.
Final Assembly
Not much to say here … after all the preparations, putting everything together went quick and smooth.

.")

And finally this is how the finished Lichtspiel looks like (no surprise here, you’ve already seen these pictures at the very beginning of this article):
One final tidbit about the hardware: The last picture shows the type plate I made. It looks like metal but it is in fact made from Laserply, an acrylic material optimised for laser engraving. Its brushed silver variety is a perfect fit for creating fake metal type plates.
I made such a type plate back in the days for BLITZbot15, and when I found some Laserply leftovers while working on the Lichtspiel I spontaneously decided that it should get a type plate as well.20
Software
Of course all this fine hardware would be rather boring if it weren’t for some software bringing it to life. Here are some quick trivia about the code I wrote (and that is available on GitHub):
- For the patch panel I implemented various effects that can be activated by connecting two of the patch panel’s sockets with a cable. One of the effects is internally known as
knightRiderfor obvious reasons (see image). - The three sliders controlling the single LED originally used the RGB color model, with one slider each mapped to the amount of red, green, and blue in the LED’s color. This seemed like an obvious choice – at least for nerds like me, but for toddlers probably not so much. The HSV color model turned out to be a much better choice: The sliders now control hue, saturation, and brightness21 of the LED, which also makes it easy to create beautiful rainbow effects by slowly rotating the encoder and simultaneously moving the hue slider, keeping the other sliders untouched.
- As mentioned before, the Lichtspiel will go into stand-by mode after some time of inactivity, turning off all LEDs. When waking up from stand-by, the LEDs in the LED strip will be restored to their previous state, so that one can seamlessly continue with whatever light pattern there
- Bonus feature: Restoring the state of the LED strip works even if the device had been completely disconnected from power in the meantime, because the state is saved to the integrated EEPROM.22

As always, everything took longer as planned and so I was still working on the software while riding the train to my family, much to the amusement of the passengers sitting around me.
If you look closely at the this picture you may notice that there is an Arduino board inside the Lichtspiel. It is not part of the device itself (as mentioned before I did not include a complete Arduino), but was used for reprogramming23 the Lichtspiel’s microcontroller every time I made some changes to the software.
The Moment of Truth
Now, after many days of work, the moment of truth had come: Would Alma like her present? Would she know how to use it?
See for yourself.


Epilogue
It’s now almost 9 months since I gave the Lichtspiel to Alma, and it stood the test of time. I once had to take it back for repair, because after a few months the USB plug for powering the device wasn’t working reliably anymore. I decided to replace it with a standard barrel connector, and added a special cable featuring a Micro USB plug on side and a barrel plug on the other, so that the device could still be powered from any USB power source.
I chose an angled barrel plug to make sure there pushing or bending the plug doesn’t put too much strain on the socket. And because cables tend to disappear spontaneously I made sure to include a spare one inside the enclosure.

.")

I also had to fix a few other minor issues: One of the support pieces in the corners of the enclosure had come loose, and the knobs on the slide potentiometers and the rotary encoder had started to come off regularly. Both issues were fixed by dauntlessly applying some glue on the affected parts.
And finally I used the opportunity to add two more special effects to the software, so that now each of the six possible connections on the patch panel triggers its own effect.
Since then the Lichtspiel has been with Alma again (who in the meantime has started to generously demonstrate the device to her younger brother) and is still working fine!
-
I used on of these (endless) rotary encoders when building BLITZbot15 and instantly fell in love with its feel. Rotary encoders forever! ↩
-
Patch panels are great fun, too. Patch panels and rotary encoders forever! ↩
-
Both the LED strip and the single RGB LED are NeoPixels that can be controlled from a single GPIO port. Initially I planned to use the same GPIO for both the single LED and the LED strip by simply chaining them – after all, NeoPixels are meant to be chained. But this led to strange effects like the single LED glowing green when it should have been red etc. Turns out that there are different flavours of the NeoPixel protocol: The single LED expects the colours to be sent in
RGBorder, whereas the LED strip expectsGRB. So I ended up using two distinct GPIO ports instead. ↩ -
You may notice that the pinout diagram is labeled “Atmega 168”, while I was using an Atmega 328. But they both share the same pinout, so nothing to worry here. ↩
-
All component boards have cables soldered onto them that are connected to plugs on the main board – except for the board carrying the slide potentiometers: Here it’s the other way round, with the cable being soldered to the main board and connected to a plug sitting on the component board. I suppose there was a reason for doing it this way, but I can’t remember. ↩
-
Building the device in no way as structured as reading this article might suggest – I was constantly going back and forth between working on different parts of the build, more or less doing everything at once. ↩
-
The LED built into the power button itself acts as a stand-by indicator, slowly pulsing at reduced brightness. This mode consumes very little power. ↩
-
Any voltage between 1.8V and 5.5V, to be exact. ↩
-
My thinking was that a real on-off switch would emulate disconnecting and reconnecting the USB cable from the power bank. But it didn’t work out, at least for the power bank I tested with. Also, a physical switch wouldn’t work well with a stand-by mode. ↩
-
Some people experimented with specialised circuits that draw high currents but only for very short amounts of time to keep the power bank from shutting off. But I decided it wasn’t worth the effort. ↩
-
Up to this project I hadn’t been aware that such a thing as acrylic spray paint existed at all. But it works very well, does not produce any nasty vapours, and is even certified for the use on toys. ↩
-
Using threaded inserts would have been an alternative. But why go for the easy way? ↩
-
I’ve already done this once, for BLITZbot15’s LCD display: There I milled a single piece of acrylic to fit exactly into the opening in BLITZbot’s case, resulting in a flush and almost seamless outer surface. Getting the milling parameters right took quite a lot of time, but it was totally worth the effort. ↩
-
Later I learned that to avoid ragged edges I should have had removed the masking pieces while the paint was still being wet. I’ll try this the next time. ↩
-
Bending the foil too sharply my cause tearing, though. This actually happened at some spots, but could easily be fixed by applying a few drops of superglue to the each tear. ↩
-
Besides holding the LED strip in place, the gaffer tape also serves to block any light from shining accidentally into the enclosure and then possibly leaking through other openings. ↩
-
The nuts were secured in the spacers using heat. Threaded inserts would have worked, too. ↩
-
In fact, the bottom part was identical to the spacers, only with its height reduced. ↩
-
The type plate also serves another purpose: Initially I had planned to use a fixed cable coming out of one of the side walls for the patch panel. Later I realised that it would be much nicer to have a loose cable with a plug on each end instead, increasing the number of possible panel connections from four to six. But then I had already drilled a hole for the fixed cable into one of the side walls. The type plate now also covers this unused hole. ↩
-
Technically, the third slider does not control the colour’s brightness, but its lightness, which is defined as the ”brightness relative to the brightness of a similarly illuminated white”. It’s complicated. Read the Wikipedia article for full details. ↩
-
An EEPROM (“electrically erasable programmable read-only memory”) is a persistent memory, meaning it does not need any power to keep its data. It’s a bit like an SSD, but with way less capacity (the Atmega 328 has exactly 1 kilobyte of EEPROM) and also several magnitudes slower, especially when writing data. But it’s perfectly adequate to persist something like the state of a LED strip. ↩
-
Using an Arduino to reprogram a microcontroller is an easy alternative if you don’t have an USB to serial adapter or a real ISP device at hand. ↩
Leave a comment