0021Fixing my Washing Machine
2019-12-08
A few weeks ago I noticed that my washing machine had stopped working: It still did its rotate-the-drum thing and also the suck-in-water-and-later-pump-it-out-again thing, but the water no longer got heated in the process.
Fun fact: It took me a while before I even noticed something was wrong – modern detergents work surprisingly well even with cold water.
Now the machine is already more than ten years old so I didn’t really want to call a “real“ service technician: Because of the age (of the machine, not the technician) I wasn’t sure if it was repairable at all1. In the worst case I could have had spent quite a lot of money and time only to find out that I would have to buy a new machine anyway.
However, before shopping for a new washing machine – why not take it apart and see if I can track down the failure? Especially because there was no need to be afraid of breaking the machine in the process, as it was already broken anyway.
First Suspect: The Heating Element
If a washing machine no longer produces heat, chances are that its heating element is broken2. How to check the heating element? Simply measure its resistance! A working heating element should have a resistance of about 20–30Ω3.
I removed the machine’s back cover to get access to its innards and the heating element. A quick check with the multimeter – and it showed 25Ω. Okay, that didn’t look broken at.
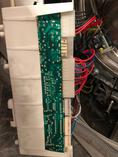
So the heating element itself seemed to be fine. Maybe the relay responsible for switching it on and off had got stuck? Because checking the relay was a bit more involved I decided to completely dismount the mainboard and take it to my lab for further examination.
This mainboard is still from the through-hole-era, featuring no surface mount components and only a single layer of traces. That made it quite easy to reverse engineer the layout and find the relay in question. I checked if it was working correctly – and it did. The relay thus wasn’t the problem either.
What else Could it Be?
So what now? Frankly, I didn’t really have an idea. Because I couldn’t think of anything else I started to examine all the solder joints on the board, but there were no obvious signs of corrosion or cold joints.
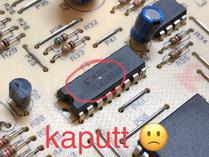
However … while looking at the solder joints I noticed something else: One of the ICs was looking a bit suspicious. There was a minuscule spot visible at the centre of its package. A speck of dust? I reached for a loupe – and behold, this seemed more like a tiny crack!
Now a crack in an IC’s package is a strong hint that there is something wrong with the chip. But what was this specific chip even for? Tracing its connections it looked like it was driving the relay connected to the heating element. Aha, the plot thickened!
I inspected that chip again. Its marking said “ULN2003A”. That was good news because a) is this chip commonly used for driving relais (which confirmed my assumption that it was indeed controlling the heating element’s relay), and b) is this chip so common that we have some spare ones in the lab.
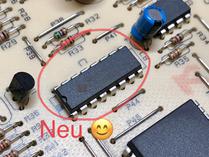
Replacing the IC under suspicion with a new one took me only a few minutes:
I took the mainboard back home, put it back into the washing machine, reconnected all the cables, and started a washing programme.
And indeed: The water got heated up!
Resumé
Since then several weeks have passed and the machine still works perfectly. Total cost of repair: About 50 cents4.


Leave a comment